Recording top-notch webinars is key for a smooth and pro-level viewer experience. It amps up content quality, keeps folks engaged, and boosts the overall webinar value. On the flip side, if your recording is low-quality, it can annoy your audience, reduce watch time for on-demand videos, and give your brand a not-so-hot image. A clear recording makes sure your message hits home, while a crummy one risks losing your audience's interest and impact.
Zoom Settings For HD-Quality Recording
Zoom can record videos in different resolutions: 360p, 720p, and 1080p. If you have a Free account and are recording with more than two people, your video will be in 360p. However, if you have a Paid account, you can enjoy higher resolutions for your recordings. There are 2 ways you can enable HD-quality recording.
Via Desktop Client
Step 1: Open the Zoom desktop client and log in
Step 2: Click on your profile picture at the top-right corner of the panel
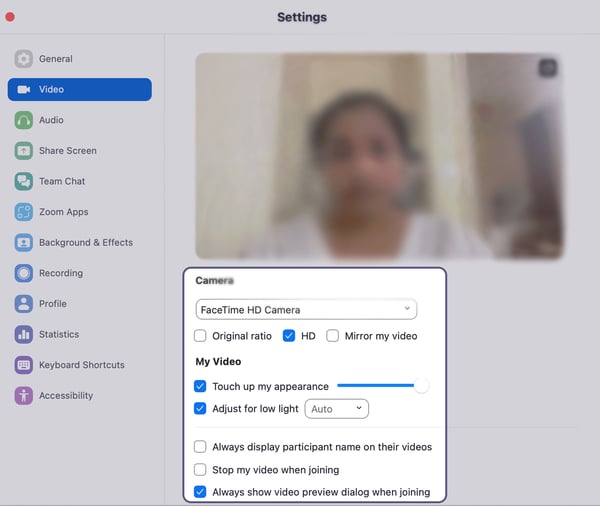
Step 3: Click on the Video tab in the left navigation
Step 4: Select your choice of HD Camera from the dropdown and select 'HD' to enable HD video

Via Your Account
Step 1: Log in to your Zoom web portal
Step 2: Click on My Account at the top right corner of the webpage
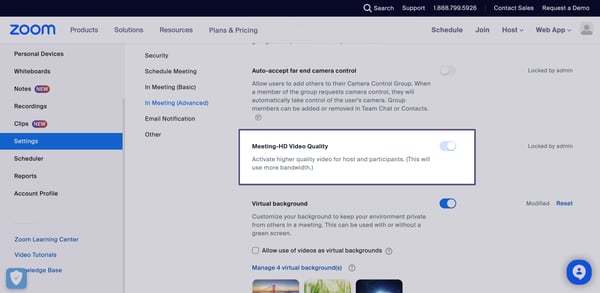
Step 3: Click on Settings in the left navigation
Step 4: Go to In Advanced Meeting and turn on 'Meeting-HD Video Quality'.

You can configure these settings once and they'll be applied to all the recordings. If you use Microsoft Teams to record webinars, you can find the settings here.
Remember that these instructions might change with updates to the platform, so it's a good idea to check the latest documentation or support resources if you encounter any issues.
